GTM lets you track clicks on any element of a webpage.
Google Tag Manager working in concert with Google Analytics 4 combine to form an underrated analytical duo. Without too much technical know-how, it’s possible to use the two to track virtually any click a user makes on a website. Beyond that, you can keep track of what’s being clicked, where it’s being clicked, and when the click occurs.
Track clicks on specific links, buttons, images… any click is trackable.
This guide includes instructions on how to set up tracking of the following elements on your website:
- Links — Tracking link clicks is simple to set up, but can offer some powerful insights on how your website is being used.
- Contact points — Make sure you’re tracking each instance of a user contacting you from your website.
- Interactive web elements— Accordions, menus, before/after image sliders… web designers are always finding new ways to make their websites more interactive. Find out if these interactive elements are being, well, interacted with by your users.
Note: If you’re not very familiar with Google Tag Manager and need detailed instructions on setting up triggers and tags, try reading the first example in this post, “Tracking clicks on a specific link” first. We get into the most detail in this example, and it should help you learn some of the basics before diving into any of the other examples in the post.
Link tracking
Tracking clicks on a specific link
A click on any link on your website can be tracked with GTM, even clicks on broken links. It’s perhaps the most basic type of click tracking you can perform with Google Tag Manager, but once you know how to set up a click trigger for a specific link you should be able to figure out the rest of the click tracking examples laid out in this post.
Create your trigger
- Go to “Triggers” and click the “New” button.
- Name your trigger. At Pilot we try to stay organized, so we use a consistent naming convention for each type of trigger. For example, all click triggers begin with “Click – …”
- Select “Click > Just Links” as the trigger type.

- What about “Wait for Tags” and “Check Validation?” The short answer: you probably don’t need to worry about ticking these boxes. If your site doesn’t struggle too much with page load and you aren’t worried about a user clicking a link before your GA4 Configuration tag fires, your click trigger doesn’t have to wait for tags. As for checking validation, you shouldn’t have to worry about enabling this if your links are all working properly.
- Select “This trigger fires on Some Link Clicks”
- For the firing conditions, use the built-in Click URL variable, and input a pattern that matches the URL for which you want to track clicks. If you want one specific URL, use “equals.” If you want to track a collection of links (e.g. any click to a blog post), you can use “begins with” or “contains” or even a regular expression to match your concerned URL clicks.

- Use the “+” if you’d like additional conditions on your trigger. For example, you could use the Page Path variable to track clicks to a specific page from a specific page. Since this trigger fires on the page where the link in question is actually clicked, Page Path essentially designates the linked URL’s referring page.
- Click the “Save” button.
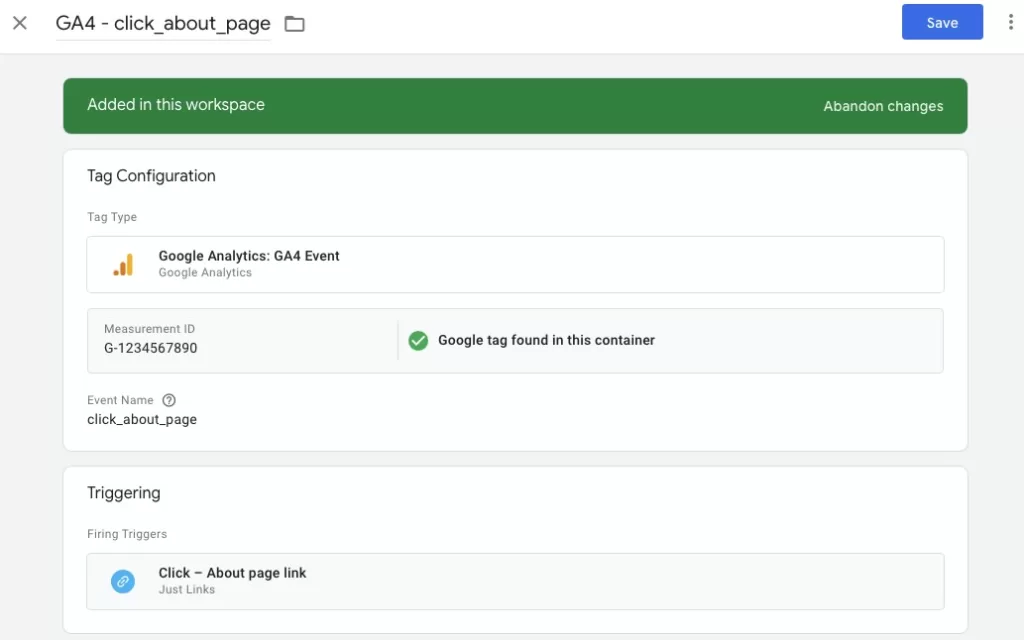
Create your tag
- Go to “Tags” and click the “New” button.
- Name your tag. Our naming convention for tags is to include the type of tag. For example, all Google Analytics tags begin with “GA4 – …”
- Click into the “Triggering” section at the bottom of the page and select the trigger you just made.
- Click “Tag Configuration > Google Analytics: GA4 Event” — this will create an event in GA4 when our URL in question is clicked.
- In “Measurement ID,” add the measurement ID from your GA4 property’s web stream. This is your unique 10 digit tracking code that begins with “G–”
- For the “Event Name” and “Event Parameters,” it really depends on what information you want to pass to Analytics and how you want it to be organized. For this example, we will use a descriptive name for our event (“click_about_page” — using snake case to match all the standard events that GA4 collects) and forgo the use of event parameters. But if you prefer a more elegant solution, read on below (or click here) to see how to send a generalized event name while using event parameters to enrich those events.
- Click “Save”
- Click “Preview” to use GTM’s debugging mode to test whether your tag is indeed firing properly. If so, click “Submit” and publish your new container.
Tracking all link clicks
Using event parameters to enrich our GA4 events
While the example above explains how to track clicks on links to a specific URL, there is an elegant solution for tracking clicks on all links on a website. You might think this would create an unwieldy list of unique event names in your GA4 property, but that’s where the elegance of GA4 parameters comes into play.
As mentioned above, you could send each click event with its own descriptive event name (e.g. link_click_about_page), but that comes with the downsides of long event names and a potentially long list of unique events being sent to GA4. Instead, we can use a generalized event name for a type of event (think UA’s “Event Category”) and event parameters to contextualize those events (think UA’s “Event Action” or “Event Label”). For this example, we will name our event “link_click” and attach two event parameters to tell us the following:
- The URL of the link that was clicked – for this, we’ll name our parameter “link_url”
- The text of the link that was clicked – for this, we’ll name our parameter “link_text”
We don’t have to worry about sending a parameter to designate which URL a user was actually on when they clicked the link in question — GA4 collects the “page_location” parameter on all events by default. This shows up in GA4 as the “Page location” dimension, and contains the full URL of the page the user was on when the event was collected.
Create your trigger
This one’s easy, since we want it to fire on all link clicks:
- Create and name a new trigger.
- Select “Click > Just Links” as the trigger type.
- Don’t worry about ticking “Wait for Tags” and “Check Validation.”
- Select “This trigger fires on All Link Clicks”
Create your tag
- Create and name a new tag.
- Click into the “Triggering” section at the bottom of the page and select the trigger you just made.
- Click “Tag Configuration > Google Analytics: GA4 Event”
- Add your Measurement ID.
- Since we want this event to fire on all link clicks, name the event something generic like “link_click”
- Now let’s add an event parameter called “link_url” with its value being the {{Click URL}} built-in variable (you may have to enable this built-in variable in your GTM container).
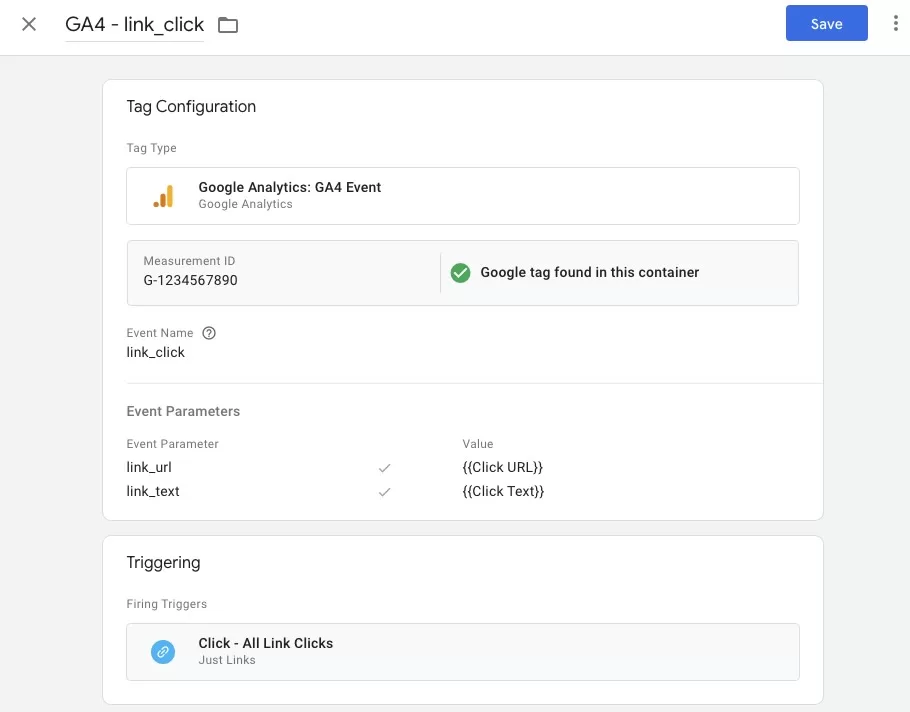
- Add a second parameter called “link_text” with its value being the {{Click Text}} built-in variable.
- Save your tag.
Seeing this parameter-level data in GA4 reports
In GA4 standard reports, you can add up to one secondary dimension. If you navigate to the “Events” report, you will see a list of all events being collected. You can filter this list of events using the search bar to just see the one event type you want to analyze. Then, click the plus (+) next to the “Event name” table heading and add either “Link URL” or “Link text” as your secondary dimension in your table.
Here is a similar example, but one where we are looking at which links in our mega menu are being clicked on most:
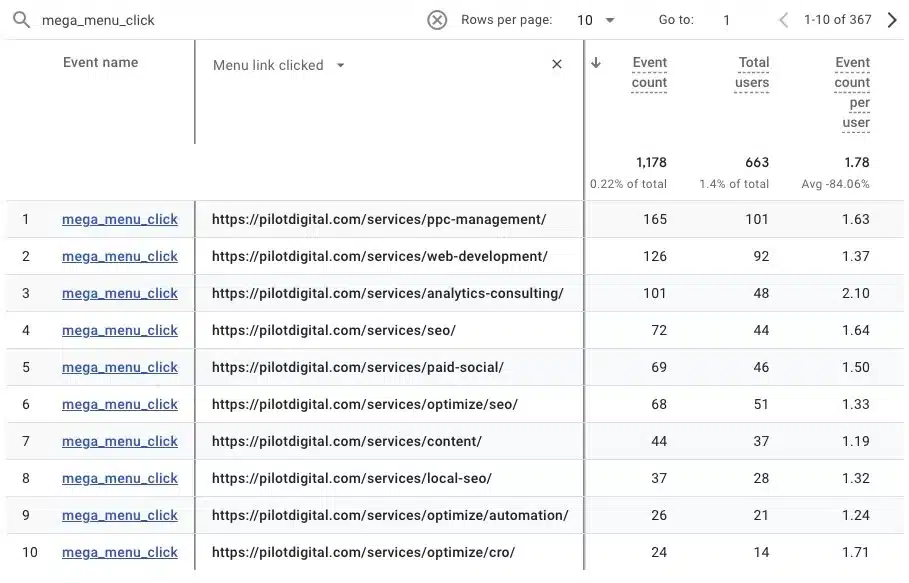
Note that you can also always use “Page location” to see which page a user was on when they clicked a link. This does not have to be manually set up, as GA4 automatically collects this information with each event.
Tracking clicks on external links
One nice thing about GA4? This is tracked by default! The event named “click” is an event that is automatically tracked in GA4 when a user clicks a link to an external domain. This event contains the following dimensions (we included the parameter values that populate those dimensions):
- Link classes (from link_classes)
- Link domain (from link_domain)
- Link ID (from link_id)
- Link URL (from link_url)
- Outbound (from outbound)
If you want to track clicks on a specific external link, use the instructions in the “Specific link” click tracking section above.
Contact Points
Tracking email address clicks
If users clicking links to send you emails is an important action on your website, you’ll want to make sure you’re tracking these actions in your Google Analytics account. An HTML email link is typically written like this: “mailto:info@pilotdigital.com.”
The steps below will show you how to track clicks on links like these, and how to log which email addresses were clicked and from which pages.
Create your trigger
- Create and name a new trigger.
- Select “Click > Just Links” as the trigger type.
- Don’t worry about ticking “Wait for Tags” and “Check Validation.”
- Select “This trigger fires on Some Link Clicks”
- For the firing conditions, use the Click URL variable. Since we want to track email address clicks, use “starts with mailto:” for the rest of your firing conditions. HTML email address links are written like this: “mailto:info@pilotdigital.com” and our new trigger will fire when a link like this is clicked.
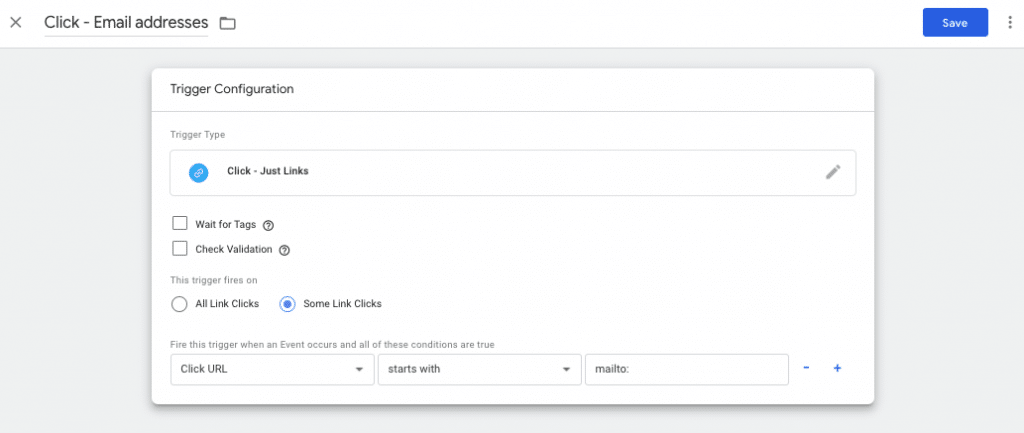
- Use the “+” if you’d like additional conditions on your trigger. For example, you could use the Page Path variable to track email links from a specific page, like your contact page.
- Click the “Save” button.
Create your tag
- Create and name a new tag.
- Click into the “Triggering” section at the bottom of the page and select the trigger you just made.
- Click “Tag Configuration > Google Analytics: GA4 Event”
- Add your Measurement ID.
- For the Event Name, let’s call it “email_click”
- Let’s add one Event Parameter called “link_url” that populates via the {{Click URL}} variable so that we can tell which email addresses are getting clicked on.
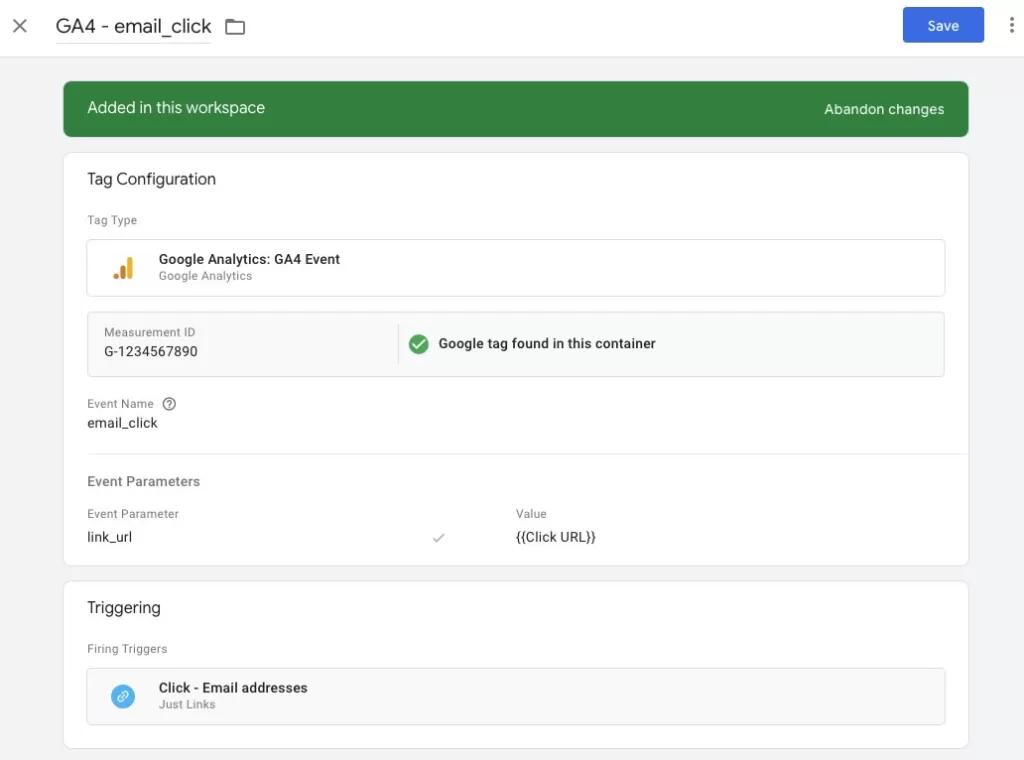
- Click “Save”
- Click “Preview” to use GTM’s debugging mode to test whether your tag is indeed firing properly when an email address link is clicked. If so, click “Submit” and publish your new container.
Tracking phone number clicks
Just like the email address link tracking above, clicks on phone number links can be an important interaction to monitor on your website. This is especially true if your website drives a lot of phone calls from mobile traffic, where tapping a link to a phone number on a website is often the easiest way to get in touch with a business or organization.
This setup is exactly the same as the email address click tracking above, with one minor change — the link we want to track starts with “tel:” instead of “mailto:”.
Follow the steps in the email address example above, but make the following alteration to Step 5 in the trigger creation section. Instead of using “mailto:” as the Click URL value, we want to use “tel:”.

Of course, be sure to change the name of the event in your GA4 event tag to describe telephone link clicks rather than email ones.
Interactive Web Elements
Some clicks don’t involve actual links—a button that triggers JavaScript, or an element that reveals a form—and tracking these requires a different setup inside of Google Tag Manager.
Tracking clicks by element ID
The easiest way to track clicks on elements that don’t contain links is to target them by their element ID.
Find your element’s ID
- To find an element’s ID, simply right click on the element and use the “Inspect” functionality of your browser.
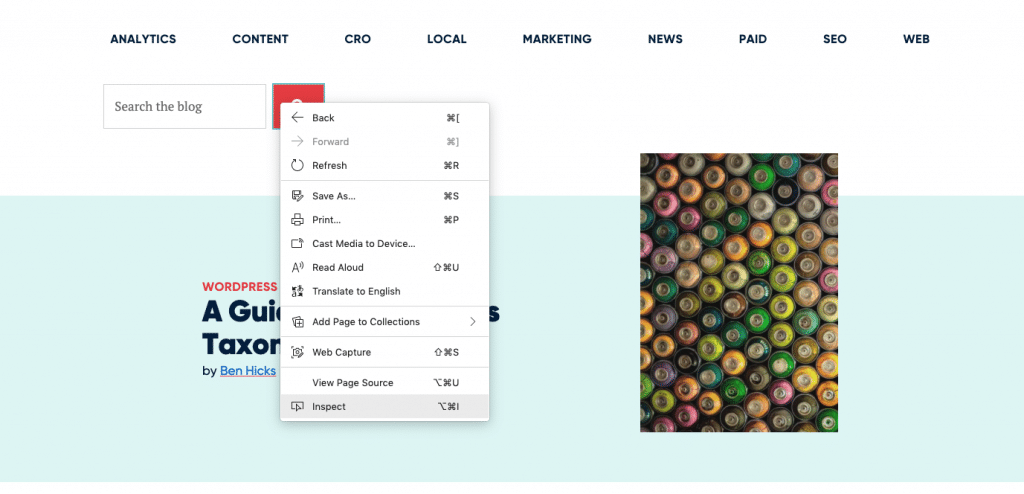
- If you’ve correctly inspected the element in question, look for “id=” in the element’s HTML.

- If your element does not have an ID, you can attempt to follow the steps below using the element’s Class, but this may present issues if that Class is used on other elements. Another option is to ask your web developer to add a unique ID to your element.
Create your trigger
- Create and name a new trigger.
- Select “Click > All Elements” as the trigger type.
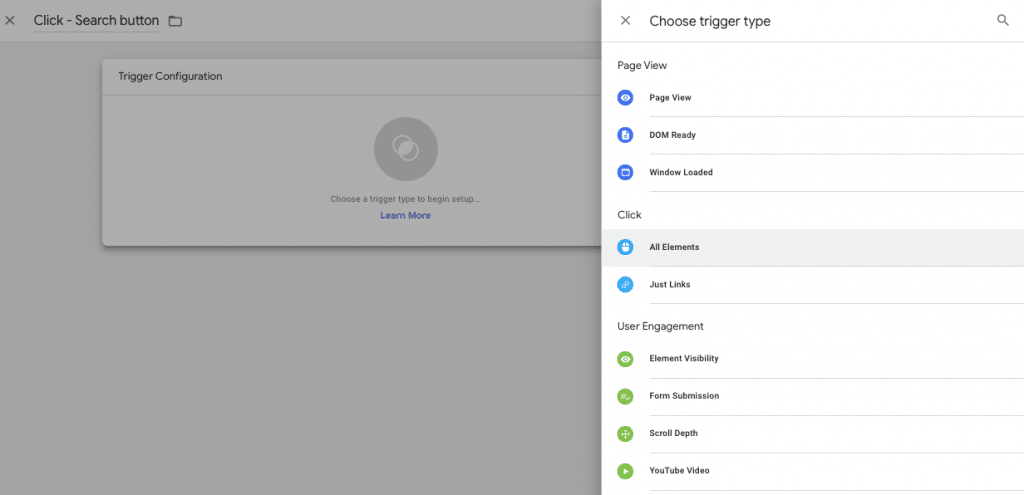
- Select “This trigger fires on Some Clicks”
- For the firing conditions, use the Click ID variable, and input a pattern that matches the Element ID you found using your browser’s inspector.
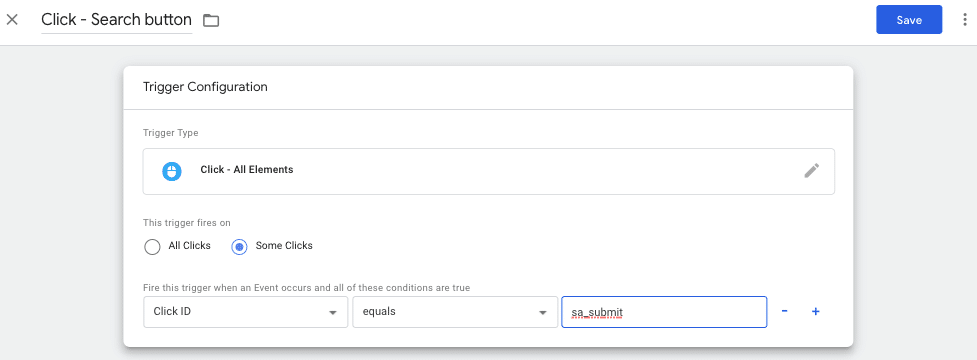
- Use the “+” if you’d like additional conditions on your trigger. For example, you could use the Page Path variable to only track clicks on this element from a specific page.
- Click the “Save” button.
Create your tag
- Create and name a new tag.
- Click into the “Triggering” section at the bottom of the page and select the trigger you just made.
- Click “Tag Configuration > Google Analytics: GA4 Event”
- Add your Measurement ID.
- For the Event Name, let’s call it “search_button_click”
- For this example, we won’t be adding any Event Parameters, since our event only happens when users click one specific button on our website so there really isn’t any additional information we need to collect. Read on in the next section for an example of using a parameter when tracking element clicks.
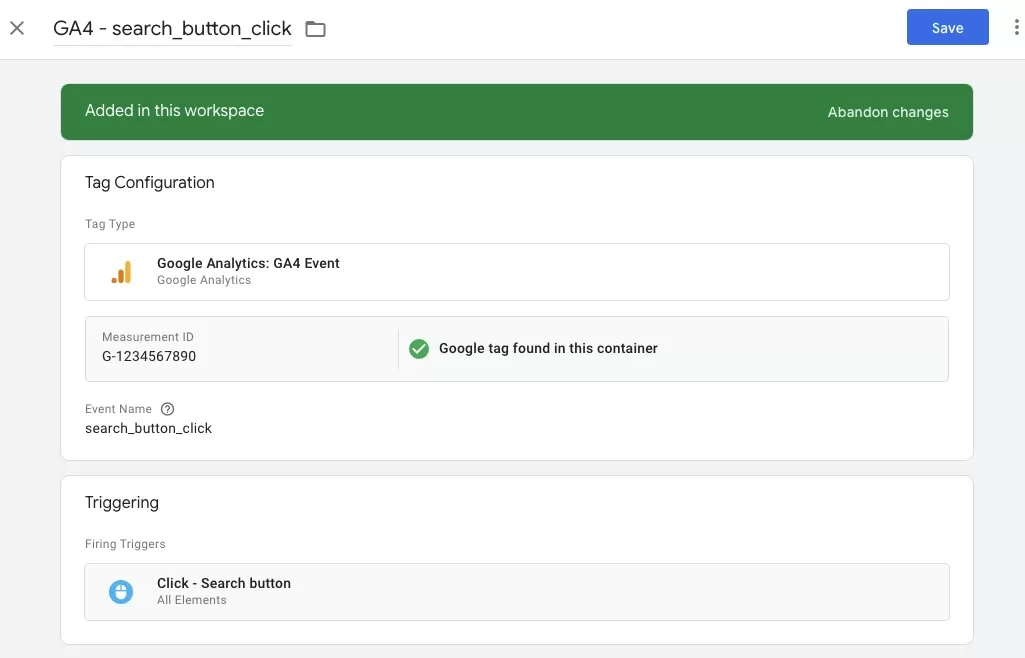
- Click “Save”
- Click “Preview” to use GTM’s debugging mode to test whether your tag is indeed firing properly. If so, click “Submit” and publish your new container.
Tracking clicks on a group of elements
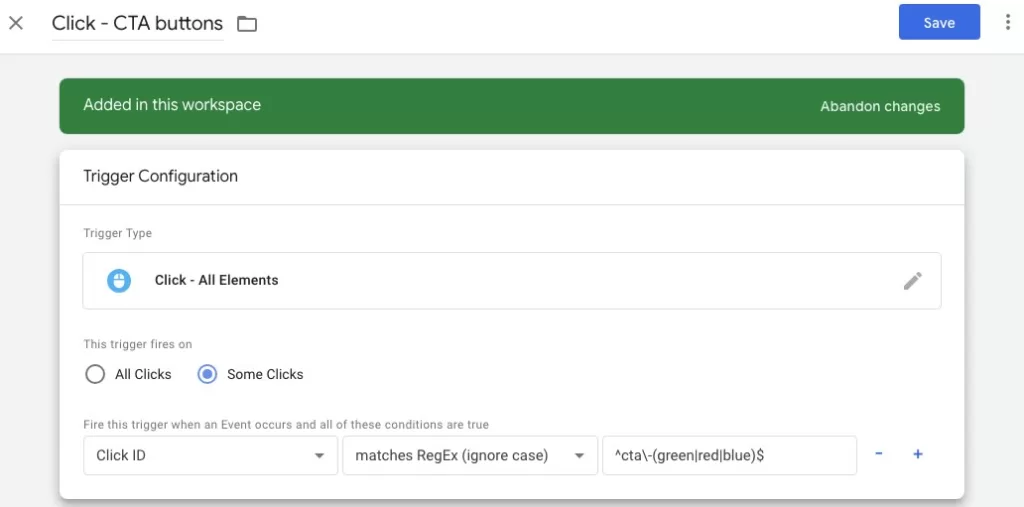
Let’s say you have a number of CTA buttons across your site. They each have a unique id= HTML property that describes them versus each other (e.g. “cta-green,” “cta-red” and “cta-blue”).
You could create a tagging structure that fires an event whenever any of these buttons is clicked, and then use an Event Parameter to pull in the value of the button ID so that your GA4 reports would tell you both the total of ALL button clicks as well as how many each button color was clicked.
Here’s the simplified process, similar to the Tracking clicks by element ID section above, but with a few slight tweaks:
- Create a trigger that fires when the “Click ID” matches a Regex for “cta-green,” “cta-red” and “cta-blue” (e.g. “^cta\-(green|red|blue)$”). Alternatively, you could create three separate triggers — one for each of the three IDs.
- Add a GA4 event tag with the Event Name “cta_button_click” that fires on the trigger we just created.
- Add an Event Parameter called “button_id” that populates via the {{Click ID}} variable so that we can tell these CTA button clicks apart from each other in GA4 reports; we’ll be able to tell which clicks were on the red button vs. the blue vs. the green.
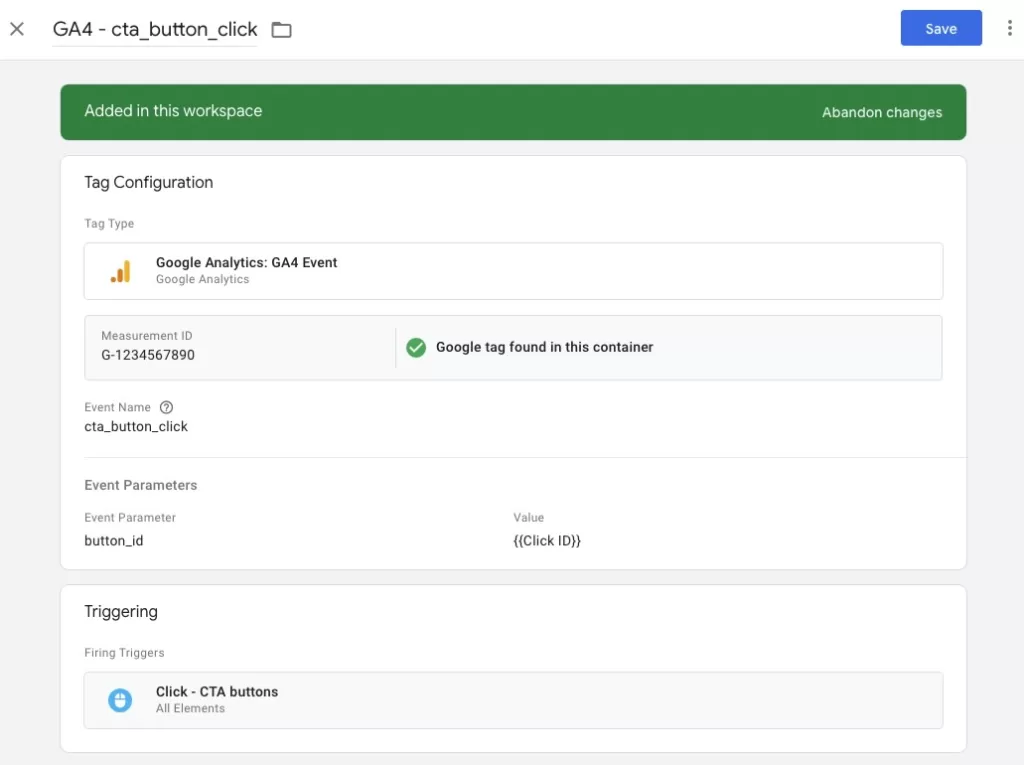
The final step will be to register “button_id” as a custom dimension in GA4 — call that dimension something simple like “Button ID.” Once that’s registered, you can use the “Button ID” as a dimension in any reports to see data specific to each button color.