
Use our easy GTM Recipe to track HubSpot Meetings in GA4
HubSpot makes a lot of things easy. Their whole brand is based on simplicity. But when it comes to tracking their calendar bookings in Google Analytics, it’s anything but.
We created this guide to make things easy on you. With this guide you will be able to fire event triggers based on bookings. These custom event triggers then enable you to:
- Fire event tags for GA4 (or any other analytics platform you may use)
- Set up conversion pixels for Google Ads, Facebook, TikTok, Microsoft Ads
Basically, everything you’d ever need.
Prerequisites for tracking HubSpot Meeting scheduler forms
We try to make it easy on you, but you’ll still need to satisfy the following criteria:
- Already using Google Tag Manager (GTM) on your site (or be willing to set it up)
- Some basic knowledge of GTM
- HubSpot booking widget embedded on the same site as your GTM container
Steps to set up HubSpot scheduler events in GTM
Download and import our GTM recipe into your container
Yes, it’s that easy. Be sure to merge and not overwrite your container. If you’ve never imported a container, follow these steps from Google.
- Download the GA4 HubSpot Booking recipe
Here’s what’s included in the imported container
- Tag: cHTML Hubspot Booking Listener – this tag is a custom html script that pushes an event outside the Hubspot iframe into the dataLayer so GTM can detect bookings
- Trigger: CE – hubspot_meeting_booked – this custom event trigger is fired when it detects the event created by the listener tag.
- Tag: GA4 Event – Hubspot Meeting– this is your GA4 event tag. It’s fired on the preceding hubspot_meeting_booked custom event trigger.
- Trigger: PV – Booking URLs EDIT – this triggers the HubSpot Booking listener tag. You will want to update this trigger to fire on URLs where your booking is embedded. For example, if your widget is on a page at /schedule-now/ you could set the trigger to:
- Page path > Contains > /schedule-now
Modify the imported tags
You will need to modify two of the imported tags and triggers before publishing your container:
- Update the GA4 Config settings of the GA4 Event – Hubspot Booking tag to use your existing GA4 Config tag.
- Optional: Modify the Event tag as you see fit. For example, you can rename the event if you use a different nomenclature. Or, add any custom event parameters you’d like to track.
- Update the PV – Booking URLs EDIT trigger to fire on only pages where your booking form is embedded.
Preview and debug the container
First, preview your updated GTM container by clicking the blue “Preview” button at the top right of the screen.
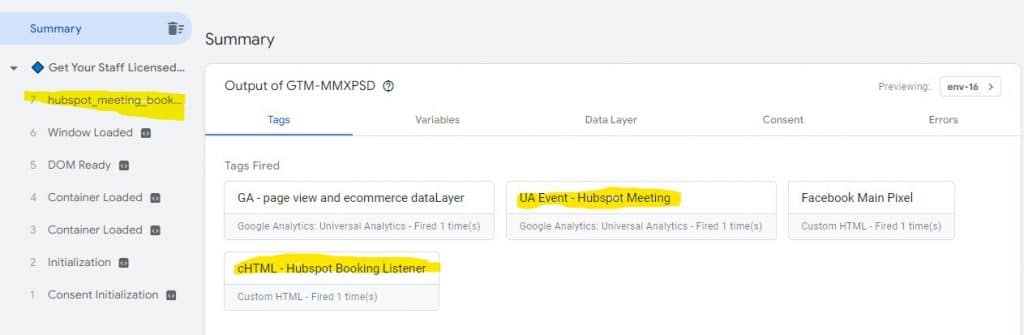
Then, check that your HubSpot Booking Listener tag is firing on pages where your booking widget is embedded. If it is, then submit a test form.
Upon submitting the booking form, you should see the custom event firing in the dataLayer along the lefthand side of the Google Tag Assistant. Likewise, your GA4 Event – Hubspot Booking tag should fire as well.
Publish the container and celebrate how talented you are!
If your testing went well, congratulations. You’ve done a great job. Publish the container and you are now pushing booking events to GA4. Next you can set the event as a conversion in GA4.