
BreadcrumbList schema helps Google see exactly what is in the breadcrumbs on a specific webpage. As a result, Google displays these breadcrumbs in search results, making your results look clean and professional:

If you have a WordPress site, implementing BreadcrumbList schema is fairly simple — with a little bit of configuration, the Yoast SEO plugin has a breadcrumb function that will automatically add the JSON-LD schema to all pages. An even simpler solution is installing the JSON-LD Breadcrumbs plugin if your site isn’t using Yoast.
However, not all platforms are created equal. As far as I can tell there is no simple or built-in breadcrumb schema function available to Sitecore users. For many sites, implementing breadcrumbs isn’t as simple as installing a plugin — you’ll have to actually place a unique JSON-LD script onto each page yourself.
Or, we can use Google Tag Manager to do it for us.
With GTM, we can use custom variables to pull the URL and text of each item in the breadcrumb on any page. From there we can use a custom HTML tag to automatically create our very own JSON-LD BreadcrumbList schema that’s specific to each page.
For reference, here is the example of a correctly written JSON-LD BreadcrumbList schema given by schema.org, which we will use as a template (the values of “@id” and “name” will be our custom variables):
<script type="application/ld+json">
{
"@context": "http://schema.org",
"@type": "BreadcrumbList",
"itemListElement":
[
{
"@type": "ListItem",
"position": 1,
"item":
{
"@id": "https://example.com/",
"name": "Dresses"
}
},
{
"@type": "ListItem",
"position": 2,
"item":
{
"@id": "https://example.com/dresses/real",
"name": "Real Dresses"
}
}
]
}
</script>
If you’re working your way through the following guide and get lost or need help, feel free to give our office a call, send us a message, or leave a comment below and we’ll try and clear things up for you.
Step 1: Defining a few variables
For each item in your breadcrumb list on a specific page type, you will have to define two variables:
- The name of the item, which displays in the breadcrumb after a > (or whatever your breadcrumb divider is).
- The URL which that item links to.
We will have to define both of these variables for every item in the breadcrumb list. So, if your breadcrumb list has 3 levels, we will have to define 6 variables. For our example, we will do just that.
Here’s our made up URL:
https://dabesttrucks.com/inventory/truck/
Here’s our breadcrumb:
Home > Inventory > Truck
This means our 6 variables will need to be configured as follows (note, you can name your variables whatever you like. I’ve used the following naming convention because it’s simple and keeps me organized):
- item-1-name — equal to “Home”
- item-1-url — equal to https://dabesttrucks.com/
- item-2-name — equal to “Inventory”
- item-2-url — equal to https://dabesttrucks.com/inventory/
- item-3-name — equal to “Truck”
- item-3-url — equal to https://dabesttrucks.com/inventory/truck/
Defining the “name” variables with CSS selector
For the values of our “name” variables (1, 3, and 5 in the list above), we want to get the actual text of each respective item in the breadcrumb. The best way to target that text is by using the text element’s CSS selector.
For the first “name” variable in our breadcrumb list, our goal is to define a variable that will return a value of “Home” on this specific page.
- First, let’s create a new variable in Google Tag Manager: click Variables, scroll down to User-Defined Variables and click on the red “NEW” button.
- Give the variable a name. To keep it simple, I choose to use “item-1-name.”
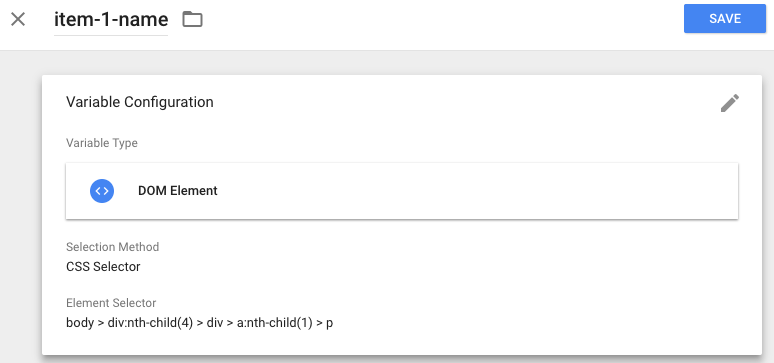
- For the Variable Configuration, scroll down to Page Elements and select DOM Element as the variable type.
- In the Element Selector field, we need to enter the CSS selector of the first item’s text element. Here’s how to obtain that:
- Go to a page on your site with breadcrumbs.
- Right click the first item of the breadcrumb and click “Inspect Element.”
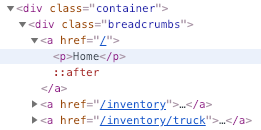
- Find the text of the breadcrumb item, right click and select “Copy selector.”
- Paste this value in the Element Selector field. It might look wild — in this case, it was body > div:nth-child(4) > div > a:nth-child(1) > p.
- We can leave the Attribute Name field empty. Click “SAVE!” Our variable should like something like this:
For however many items your breadcrumb list has, you will need to make that many “name” variables. Just follow the steps above for each text element, and name them accordingly (e.g. “item-2-name,” “item-3-name”).
Defining the URL variables with JavaScript
Now we need to get the link destination URL of each breadcrumb item. Unfortunately, the href= value of an <a> element can’t be identified with CSS selector. To grab the URL, we’ll need to use JavaScript. If you’re a novice, give the steps below a try but know that you’ll most likely need the help of someone with a working knowledge of JavaScript to iron out any kinks.
For the first URL variable in our breadcrumb list, our goal is to define a variable that will return a value of “/” on this specific page.
- Same as before, create a new variable in Google Tag Manager: click Variables, scroll down to User-Defined Variables and click on the red “NEW” button.
- Give the variable a name. To stay consistent, I choose to use “item-1-url.”
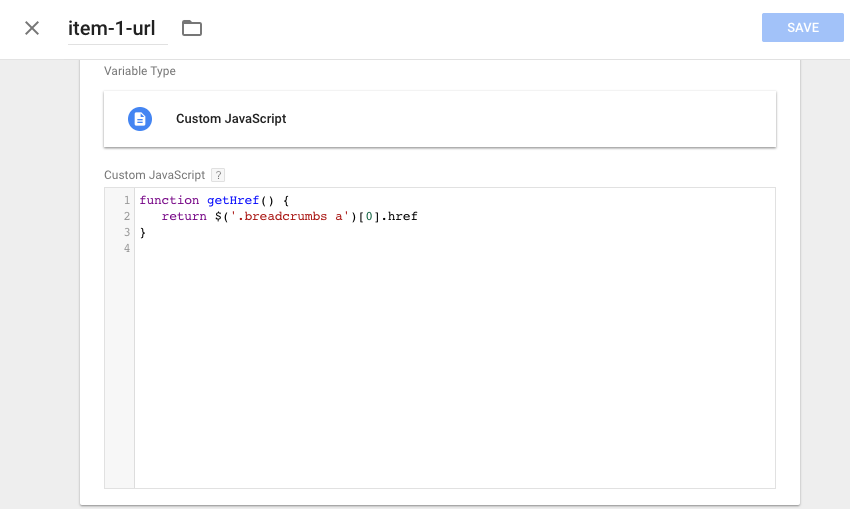
- For the Variable Configuration, underneath Page Variables select Custom JavaScript.
- Write a JavaScript function that will return the URL of the 1st item. As a reminder, here is the HTML on the page:
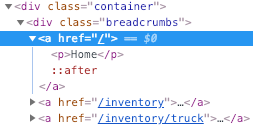
And here is the JavaScript I’ve used that will return the value of “/”:
function getHref() {
  return $('.breadcrumbs a')[0].href
}
To explain a bit further:
- In my example, the entire breadcrumb list is inside one element with class=”breadcrumbs”. Your list’s class will replace “breadcrumbs” in my JavaScript.
- The [0] identifies the FIRST <a> element in our <div class=”breadcrumbs”>. When creating the variable for the second URL item in the breadcrumb list (in our example, “/inventory/”), you will need to use [1]. For the third, use [2].
- Click “SAVE!” Our variable should look something similar to this:
Same as with the “name” variables, you will need to make URL variables for however many items your breadcrumb list has. Just follow the steps above for each breadcrumb item, and name your variables accordingly (e.g. “item-2-url,” “item-3-url”).
Step 2: Creating a tag that inserts our custom HTML JSON-LD schema
Now that we have our user-defined variables, it’s time to fit them into the JSON-LD schema template from the beginning of this post.
- Go to Tags and click the red “NEW” button.
- Name your tag. Since the tag we are making is for a page with 3 breadcrumb items, let’s name this tag “Breadcrumb schema – 3 items.”
- For the Tag Configuration, scroll down to the Custom section and select Custom HTML Tag.
- Now, we enter our schema script in the HTML field. Basing this off of schema.org’s example, our script looks like this:
<script>
(function(){
    var data =
{
 "@context": "http://schema.org",
"@type": "BreadcrumbList",
"itemListElement": [{
"@type": "ListItem",
"position": 1,
"item": {
"@id": "{{item-1-url}}",
"name": "{{item-1-name}}"
}
},{
"@type": "ListItem",
"position": 2,
"item": {
"@id": "{{item-2-url}}",
"name": "{{item-2-name}}"
}
},{
"@type": "ListItem",
"position": 3,
"item": {
"@id": "{{item-3-url}}",
"name": "{{item-3-name}}"
}
}
]
}
var script = document.createElement('script');
   script.type = "application/ld+json";
script.innerHTML = JSON.stringify(data);
document.getElementsByTagName('head')[0].appendChild(script);
})(document);
</script>
The first section of the script is the actual JSON-LD schema, while the final 5 lines are responsible for injecting the script onto the page.
- Click “SAVE!”
IMPORTANT NOTE: This tag will work for pages with 3 items in their breadcrumb lists. For a page with two items, you can simply remove the third List Item in the script. For a page with 4 or more, you will need to have more user-defined variables for the name and URL, and you’ll also need to expand your schema script to include more List Items.
Step 3: Creating a trigger that prompts our tag to fire
For most sites, the breadcrumbs on any particular page coincide with the URL structure for that page. That is to say, the breadcrumbs on my example page — https://dabesttrucks.com/inventory/truck/ — look like this: Home > Inventory > Truck
In our experience, this is Google’s most preferable layout of URL & breadcrumb — they’re most likely to correctly show the breadcrumbs in a search result when the two are so aligned.
If your site’s architecture is set up this way, it also makes it easy to set up a “3 breadcrumb” trigger to fire on pages with a URL structure that would suggest 3 breadcrumbs — e.g. home.com/first-level/second-level/. Here’s how to make that happen:
- Go to Triggers and click the red “NEW” button. (Noticing a theme here? Anytime you need to make something in GTM, look for the red “NEW” button.)
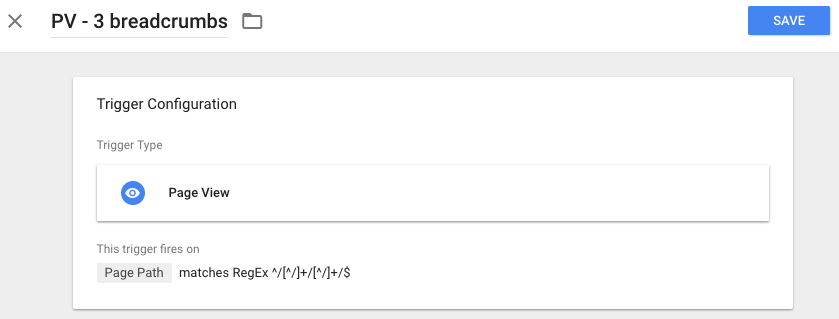
- Name your trigger. Since we want ours to fire on any page view of URLs with 3 breadcrumbs, let’s name ours “PV – 3 breadcrumbs.”
- For our Trigger Type, select Page View. Then select “Some Page Views.”
- We want our trigger to fire with Page Path > matches RegEx > ^/[^/]+/[^/]+/$
- That regular expression counts the forward slashes to make sure that the URL of the page goes 2 levels deep.
- Click “SAVE!” Our trigger should like something like this:
Step 4: Linking our trigger to our tag, and testing
What’s a trigger without a tag to fire? Not much! Let’s set it up so that our trigger is firing the tag we made, and our schema is being injected onto the right pages.
- Go back into the tag you created in Step 2.
- At the bottom of the page, click into the Triggering section. Then select the trigger you made in Step 3.
- Click “SAVE!”
To test that everything is in working order, hit the “PREVIEW” button at the top right of the screen and in a new tab (in the same window!) open up a page on your site with 3 breadcrumb items.
If GTM is installed correctly, the Google Tag Manager debugger should display at the bottom of the page. If your trigger is functioning properly, you should see the tag “Breadcrumb schema – 3 items” underneath Tags Fired On This Page. If not, the trigger needs troubleshooting.
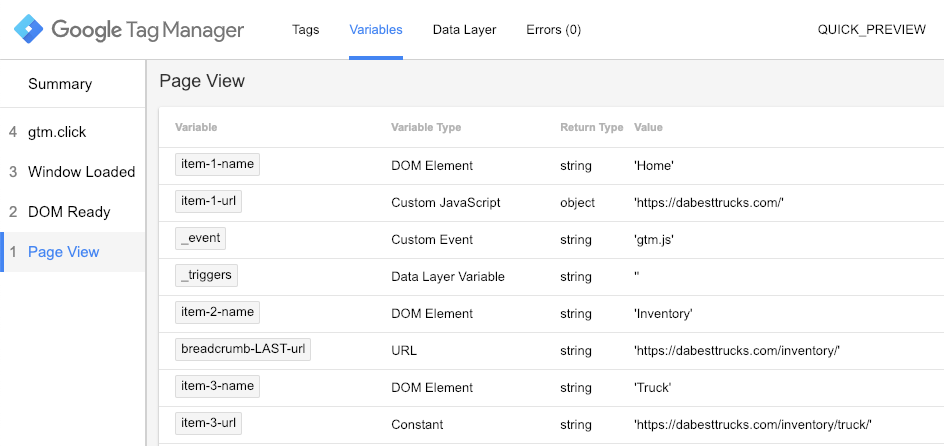
If the tag did fire, let’s check to see if it’s pulling the right values for our custom defined variables:
- At the bottom of the left-hand side of the debugger, click 1 – Page View. This is because our tag (should have) fired on the initial page view, and we can inspect the associated variables further in this section.
- You should see the tag again under Tags Fired On This Event. Click the tag.
- In this view, you can look at the HTML script that the tag has injected, but it’s a bit tough to decipher in one big chunk. Instead, click Variables at the top of the page.
- Finally, check and see if all of your user-defined variables are in attendance, and especially check that they have the correct values. You can see here that all my ducks are in a row and my variables are pulling the values I want:
Woohoo! Now we’ve got one last test to do, though for this one we’ll have to publish our tag, trigger, and variables in Google Tag Manager. Head back to GTM, submit and publish!
Everything is now in place, we just need to make sure Google is seeing our structured data markup. For our final test, we’ll use Google’s Structured Data Testing Tool.
- Enter the URL you’d like to test (in our example, one with a 3-item breadcrumb list).
- Check to see “BreadcrumbList” in the list of Detected structured data:
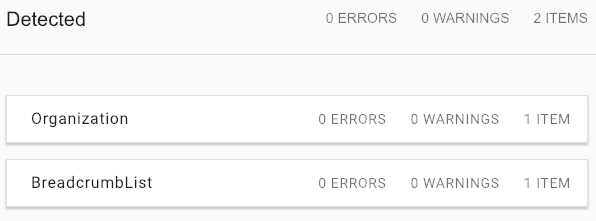
If it’s not there, something is wrong in your tag — focus your troubleshooting efforts there.
- If it’s there, click on it! Check to see if all of our variables are where they should be, and in the right order. Our example’s schema is in perfect working order:
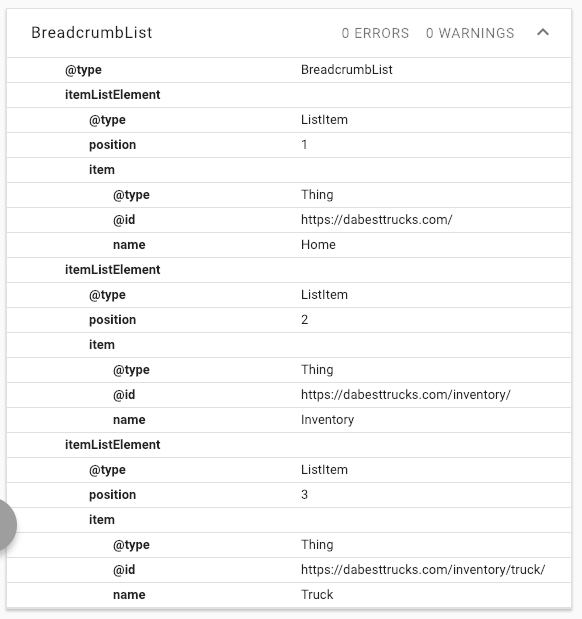
If something isn’t there or the order is wrong, you’re very close! You may have a typo in your tag and/or variables.
In the case that all is as it should be, congratulations! Be patient while Google re-crawls your pages, and enjoy these sweet breadcrumbs in your search results within a week or two:
As always, if you have any trouble getting your breadcrumbs properly marked up — or any other Google Tag Manager issues/questions — give our office a call, send us a message, or leave a comment below and we’ll do our best to help you out.