
GTM + DTR FTW
When it comes to getting the most out of your Google Ads campaigns, creating a smooth, personalized experience for your visitors can make a huge difference. One of the easiest ways to do this is by dynamically updating the content on your website based on information from the ad they clicked—like the location they’re searching from. It makes your site feel more relevant, which can lead to better engagement and conversions.
If you’ve already checked out our article on Dynamic Hyper-local Ads, you know how valuable this approach can be. But how do you actually make it happen on your site?
In this post, we’ll show you how to use Google Tag Manager (GTM) and a little bit of JavaScript to automatically update text based on location parameters in your URL. It’s a simple, effective way to keep your landing pages relevant and engaging for every visitor.
How our dynamic text replacement system using GTM works
This system dynamically updates text on your website using Google Tag Manager (GTM) and JavaScript, typically for Google Ads campaigns that include a location parameter in the URL. The process involves capturing the URL parameter, mapping it to a more user-friendly value like a city name, storing that value in a cookie, and updating text across the site as users navigate between pages. Here’s how you can set it up:
Summary of Steps
- Create a URL Parameter Variable in GTM
Set up a variable in GTM to capture the location parameter from the URL (e.g., ?location=1016250). - Map the URL Parameter to a Value
Use a custom JavaScript variable to map the location ID to a readable value like a city name. - Set a Cookie for the City Name
Store the city name in a cookie so the value persists as users move between pages on your site. - Add the .dynamic-location Class to Your HTML
Mark the text element on your page where the city name should appear by adding the .dynamic-location class. - Create a Tag to Dynamically Update Text
Create a custom HTML tag in GTM that reads the cookie value and updates the text on the page accordingly. - Preview and Debug in GTM
Use GTM’s Preview mode and an example URL with a location parameter to ensure the setup works, and check the browser console for any errors.
Setting Up URL Parameter Variables in GTM
The first thing you’ll need to do is create a URL parameter variable in GTM. This variable will capture the location ID from the URL, which we can then use to dynamically update text on the landing page.
- Create URL Parameter Variable:
- In your GTM container, click on “Variables.”
- Under “User-Defined Variables,” click “New.”
- Name this variable Page URL Parameter – Location.
- Select “URL” as the variable type, set the component type to “Query,” and enter location as the query key.
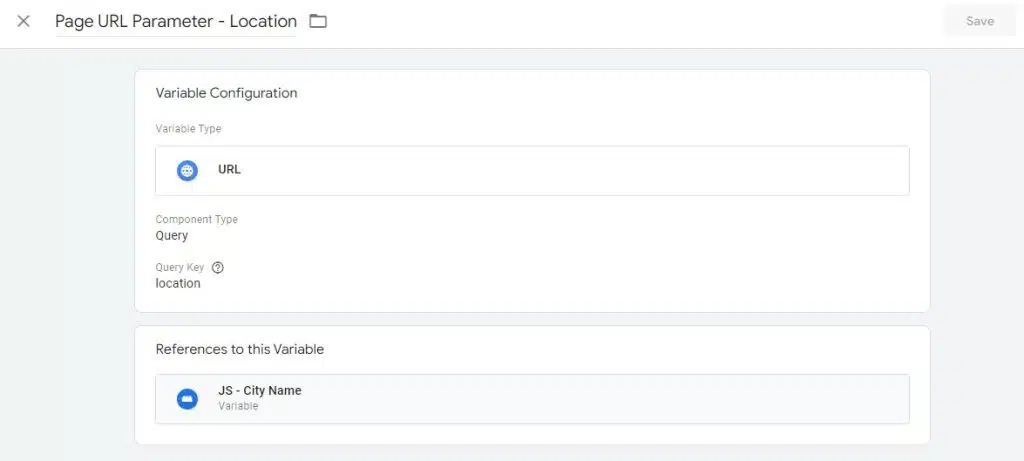
This variable will now capture the location parameter (e.g., ?location=1016250) from the URL, which we will map to a more meaningful value like a city name.
Mapping URL Parameters to User-Friendly Values with JavaScript
Next, we’ll create a custom JavaScript variable to map the location ID from the URL to a more user-friendly value, like a city name.
- Create a Custom JavaScript Variable:
- Name this variable JS – City Name.
- Use the following code to map location IDs to city names:
function() {
 var locationMapping = {
    1016250: "Addison",
    1016255: "Algonquin",
    1016257: "Alsip",
    1016265: "Antioch",
    // Add more mappings as needed
    1016804: "River Grove"
  };
  var locationId = {{Page URL Parameter - Location}};
  return locationMapping[locationId] || 'Unknown';
}- This JavaScript code translates the location ID into a city name. If no match is found, it will return ‘Unknown’, which you can handle in your dynamic content logic.
Above are sample mappings. It would be smart to limit your variable to only include location IDs that you plan on targeting. You can find a CSV file of all the location IDs here, or check out this Google sheet with the Location IDs we created.
Storing the City Name in a Cookie for Consistent User Experience
To ensure that the city name persists as the user navigates through your site, we’ll store it in a cookie. This way, we can dynamically update text on every page, even if the URL no longer has the location parameter.
- Create a Custom HTML Tag to Set the Cookie:
- In GTM, go to “Tags” and click “New.”
- Name the tag Set City Name Cookie and use the following code:
<script>
  (function() {
    function setCookie(name, value, days) {
      var expires = "";
      if (days) {
        var date = new Date();
        date.setTime(date.getTime() + (days * 24 * 60 * 60 * 1000));
        expires = "; expires=" + date.toUTCString();
      }
      document.cookie = name + "=" + (value || "") + expires + "; path=/";
    }
    var cityNameFromURL = {{JS - City Name}};
    if (cityNameFromURL && cityNameFromURL !== 'Unknown') {
      setCookie('cityName', cityNameFromURL, 7); // Set cookie for 7 days
      console.log("Cookie set: cityName=" + cityNameFromURL);
    }
  })();
</script>- This will ensure that the city name is stored in the user’s browser, making it easy to display consistent dynamic content across different pages.
Dynamically Updating Text on the Page
Now, let’s dynamically update the text on the page based on the city name stored in the cookie. For this to work, you’ll need to add the .dynamic-location class to the element on your website where the city name should appear.
Example:
<h1>Welcome to <span class="dynamic-location">[default city]</span>!</h1>This way, any text within the <span> element will be replaced with the city name.
- Create a Custom HTML Tag to Update the Heading:
- Name this tag Update Dynamic Location and use the following code:
<script>
  (function() {
    function getCookie(name) {
      var nameEQ = name + "=";
      var ca = document.cookie.split(';');
      for (var i = 0; i < ca.length; i++) {
        var c = ca[i];
        while (c.charAt(0) === ' ') c = c.substring(1, c.length);
        if (c.indexOf(nameEQ) === 0) return c.substring(nameEQ.length, c.length);
      }
      return null;
    }
    function updateHeading() {
      var cityName = getCookie('cityName');
      console.log("City Name to be used:", cityName);
      if (cityName && cityName !== 'Unknown') {
        var headings = document.querySelectorAll('.dynamic-location');
        headings.forEach(function(heading) {
          heading.textContent = cityName;
        });
      }
    }
    document.addEventListener('DOMContentLoaded', updateHeading);
    window.addEventListener('load', updateHeading);
  })();
</script>
This script will look for the .dynamic-location class in your HTML and update the text with the city name stored in the cookie.
Previewing and Debugging in GTM
Before publishing your changes, it’s important to preview your setup in GTM to ensure everything works as expected.
- Enter Preview Mode:
- In your GTM workspace, click the “Preview” button. This will enable GTM’s debug mode, where you can test changes without publishing them.
- Test with an Example URL:
- Use a URL with a location parameter to test if the dynamic text updates correctly. For example:
https://yourwebsite.com/?location=1016804
- Use a URL with a location parameter to test if the dynamic text updates correctly. For example:
- Check the Console:
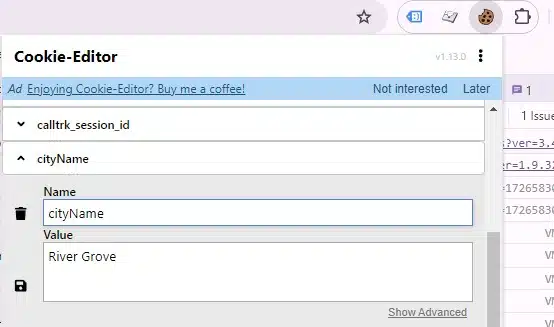
- Open your browser’s developer tools (usually F12 or right-click and select “Inspect”) and go to the “Console” tab. You should see log messages like “Cookie set: cityName=River Grove” and “City Name to be used: River Grove”. If you see ‘Unknown’, it means the location ID wasn’t mapped properly or the cookie wasn’t set.
- Verify the Text Changes:
- Check the page to see if the text within elements with the
.dynamic-locationclass updates to match the city name.
- Check the page to see if the text within elements with the
If you aren’t comfortable with using the browser console, you can use an extension like Cookie Editor to check the status of your cookie:
Common Issues and Troubleshooting
While this setup works smoothly in most cases, there are some common issues you may encounter:
1. Text Doesn’t Update on Subsequent Pages:
- Problem: This typically happens when the cookie is not set correctly.
- Solution: Double-check the JavaScript variable that sets the cookie. Ensure the city name is being mapped correctly and the cookie is being stored. Use console.log() in the browser developer tools to inspect if the cookie is actually set.
2. Dynamic Text Fails to Update:
- Problem: The page may load before the JavaScript runs, or the selector
.dynamic-locationisn’t finding the correct elements. - Solution: Make sure the tag that updates the heading is triggered on “All Pages.” Additionally, ensure that the elements you want to update have the correct class or ID.
3. URL Parameter Not Captured:
- Problem: If the URL parameter isn’t captured, the dynamic content won’t load properly.
- Solution: Verify that the URL parameter variable is set correctly in GTM. You can use GTM’s Preview mode to check if the variable is being populated with the right value.
Keeping Your Ads Relevant with Dynamic Location Insertion
By following these steps, you can ensure that your Google Ads remain relevant to users from the ad click to the landing page. This seamless personalization can significantly boost engagement and conversion rates.
For a deeper dive into how dynamic location insertion works in Google Ads, check out our companion article on Dynamic Hyper-local Ads.
By using GTM and a little JavaScript, you’re well on your way to creating a personalized and engaging user experience that resonates with your audience.